TL;DR: If you run OpenWrt with mwan3 (multi-WAN failover) and a split-tunnel WireGuard VPN (i.e., you’re NOT routing all traffic through it), add nohostroute=1 to your WireGuard interface. Without it, netifd creates a static route for the WireGuard endpoint at interface-up time, pinned to whatever uplink happens to be active at that moment. By the first corollary of Murphy’s Law, anything that can go wrong will go wrong at the worst possible moment — so your primary link will be down precisely when WireGuard starts, and the endpoint route gets permanently stuck on the backup. Your VPN will be stuck on the slow backup while your primary link sits there doing nothing. You won’t notice until you need to transfer something big.
(If you are routing all traffic through WireGuard, you need the host route to prevent a routing loop — but on a multi-WAN setup, the same stale-route problem applies. You’ll need a different workaround, like a hotplug script that updates the endpoint route when mwan3 switches uplinks.)
Today I discovered that my WireGuard tunnel to a remote server has been crawling at 2 Mbps since early February. The fix took two UCI commands. The root cause was the missing nohostroute flag — plus a bonus: my own firewall was sabotaging my own health checks, making the fiber look unreliable enough that the system never self-corrected.
Here’s the full forensic story, because I’m still furious and you deserve to learn from my suffering.
But first, some context on how this investigation actually happened. I was working with an AI coding assistant (Claude Code) that has SSH access to my infrastructure. This is possible because I have a clean foundation: SSH key authentication everywhere, proper internal DNS (m42, golem resolve to the right VPN addresses), WireGuard mesh between all nodes, and the assistant connects through a ssh-agent running as a systemd user service. One environment variable and the AI can reach every machine in my network — and, critically, cross-reference what it finds on one machine with data from another. This investigation would have taken me hours of jumping between terminals. The AI did it in minutes, methodically testing hypotheses across three machines simultaneously. The infrastructure investment in proper SSH, DNS, and VPN paid off enormously.
It’s like having an incredibly fast, skilled, and thorough engineer sitting next to you — one that really allows your creativity to flow without borders. You say “what if we…” and 30 seconds later you’re looking at a working prototype. You go “no, more like this” and it’s done before you finish explaining why.
That’s what working with Claude Code felt like over the past two days. I completely revamped this blog — translated all 69 posts to Italian, redesigned the layout from the ground up, added a nerdy boot sequence easter egg, cleaned up years of tag cruft, and iterated through dozens of design decisions. All of it tracked in git, all of it reviewable, all of it live.
Every single commit is public. If you want to see the raw process — the brainstorming, the iterations, the bugfixes, the back-and-forth — it’s all in the repo: github.com/vjt/sindro.me (and the theme fork: github.com/vjt/hugo-sindrome-theme). I’m not ashamed of showing how the sausage is made. If anything, I hope someone finds it useful as a learning resource for what AI-assisted development actually looks like in practice — warts and all.
Here’s my GitHub contribution graph to prove I’m not exaggerating:
You open the app to check your alarm status and you’re greeted by an ad for Verisure itself. I pay through the nose for the service and they shove ads inside the app. It’s 2026 and a security company is showing me banner ads when I’m trying to verify that my house is protected.
The ads are the least of it:
Blind routines. Arm at midnight, disarm at 7. The app has no idea where you are. Still in the garden at midnight? The alarm arms and the sensors trip. Window open? The panel announces it can’t arm — if you don’t hear it, the alarm stays disarmed. Forget to disable the morning disarm before going on vacation? Alarm off, empty house. And routine changes take 20 minutes to propagate — “or the next day”. In 2026.
Zero presence awareness. No location, no who’s home, no cleaning-lady-just-left. No location-based automation at all.
One camera at a time. Tap, wait, back, tap the next one, wait. No overview, no “capture all”.
Slow. Request an image, wait, wait, maybe it arrives. Sometimes you reload and try again.
No permanent storage. Captured images vanish. No history.
No timestamps on images. You capture a photo and you don’t know when or which camera. You have to remember. For a security system, embarrassing.
Generic notifications. One notification, same for everyone. No actionable buttons, no critical alerts that bypass Do Not Disturb.
What I wanted: my alarm in my smart home, real automations, notifications for all residents, and a dashboard that shows everything at a glance. No ads.
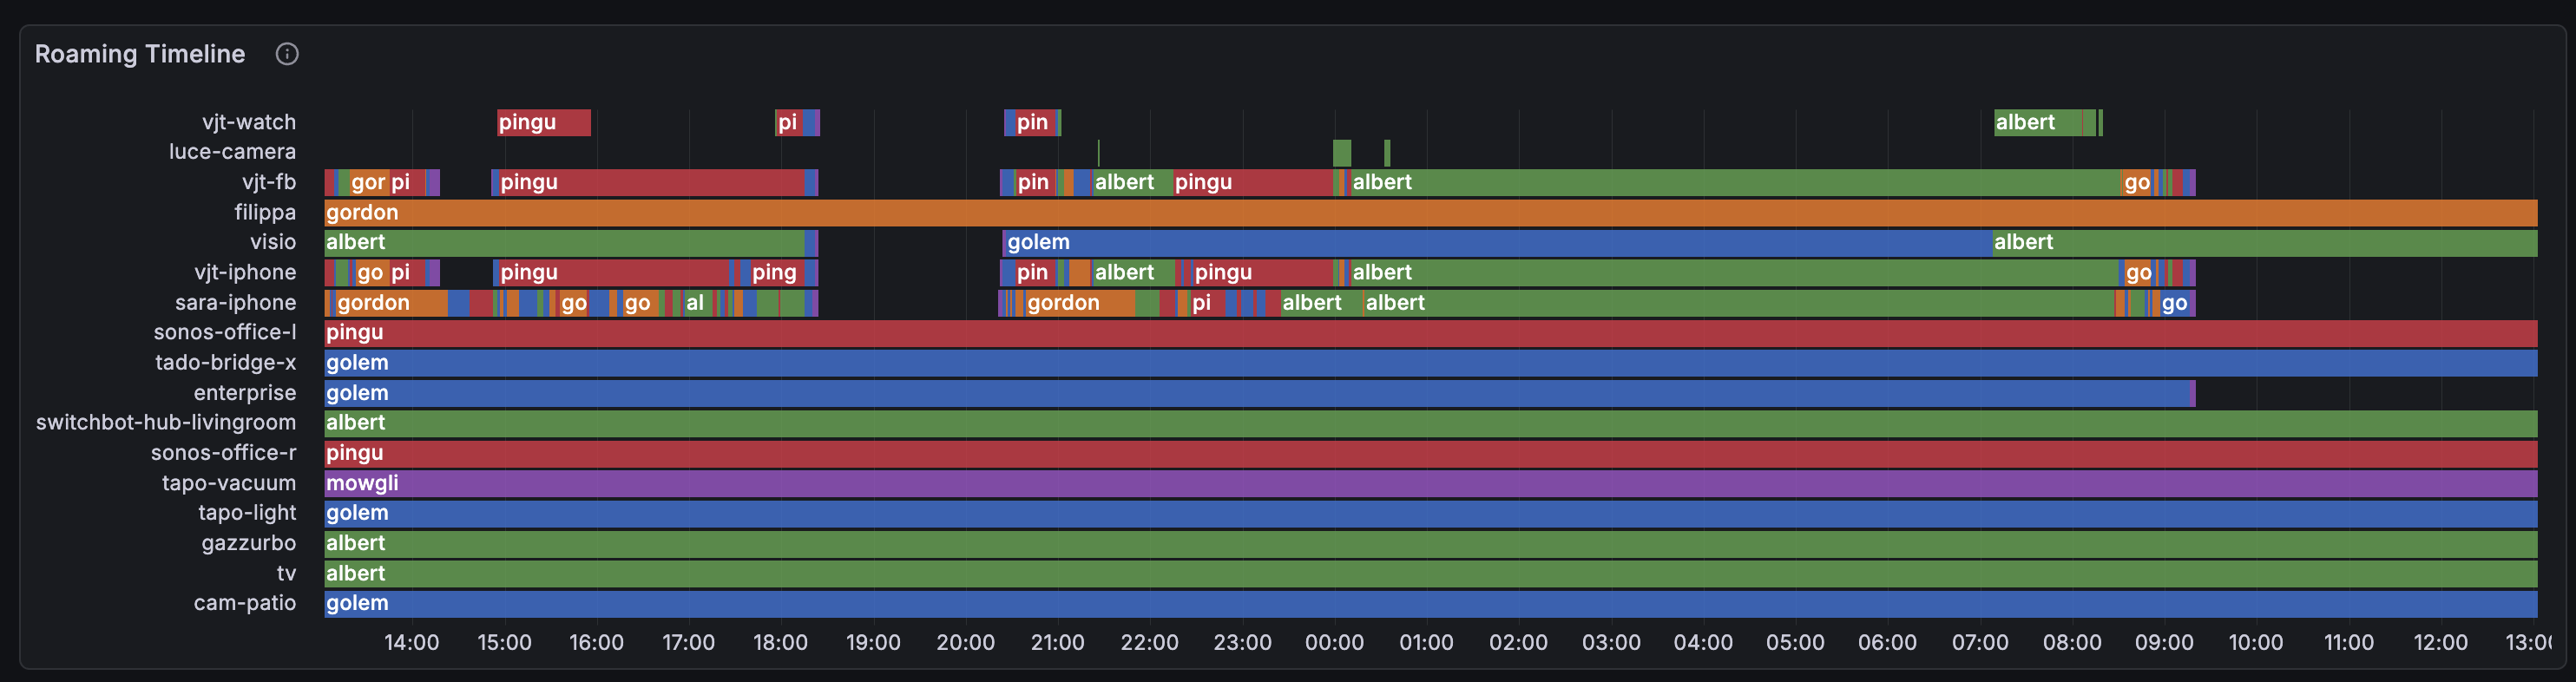
It started with WiFi presence detection. I had built a system that tracks which room everyone is in by scraping RSSI from my OpenWrt APs. It worked — but the room assignments kept flickering. Kitchen. Office. Kitchen. Office. Three times in ten seconds. The state machine was fine. The WiFi wasn’t.
My home network runs six OpenWrt APs across three floors, two SSIDs — Mercury on 5 GHz, Saturn on 2.4 GHz — all backed by 802.11r for fast roaming. From the outside, it looks like a proper mesh. From the inside, one phone was bouncing between access points 129 times in 24 hours.
I didn’t know this until I built the tool to see it.
Each row is a WiFi client, the color shows which AP it’s connected to. Healthy clients show long solid bars. Sick ones look like barber poles. See sara-iphone? That rainbow stripe is 129 connects in 24 hours — the phone is walking through an overlap zone between two APs where both have roughly equal (and terrible) signal.
I maintain a bunch of custom OpenWrt packages across four architectures: MediaTek Filogic (aarch64) — including the GL-X3000 running my own vanilla OpenWrt 25.12 build, Raspberry Pi 2 (ARM), Ramips MT7621 (MIPS), and Atheros ath79 (MIPS). The OpenWrt SDK only runs on x86_64. I don’t have a dedicated build server. I don’t want one either — a box sitting idle 99.9% of the time just to compile .ipk files every few days is offensive to my sense of resource allocation.
So I built openwrt-builder: a system that polls my repos for changes, spins up a throwaway Hetzner cloud VM when it needs to compile, builds the packages, ships them back, and destroys the server. All controlled via Telegram.
I had two problems with Home Assistant’s presence detection.
The first: GPS tells you if someone is home, but not where in the house they are. My home has six OpenWrt access points spread across three floors. They already know exactly which phone is connected to which AP at every moment — that’s room-level presence data, sitting right there in the WiFi stack, screaming to be used. Knowing who’s in which room opens up a whole class of automations that GPS can’t touch: lights that follow you, climate control per occupied room, a dashboard that shows the household at a glance.
The second: our housekeeper stays at our place a couple days a week. I don’t want to set up a full HA account for her, install the companion app on her phone, or deal with GPS permissions. But I do need to know if she’s home — because my alarm automation needs to know whether the house is actually empty before arming. Her phone connects to WiFi. That’s all I need.
So I wrote openwrt-ha-presence: a state machine that scrapes RSSI metrics directly from your OpenWrt APs, figures out which room each person is in by signal strength, and publishes per-person home/away state to Home Assistant via MQTT Discovery. No cloud, no beacons, no log parsing, no time-series database. Python, async, ~600 lines of actual logic.
A couple of months ago, my fiber went down. As per Murphy’s first corollary, it happened at the absolute worst moment: right before a crucial meeting with a partner company. I found myself frantically jamming between a distant neighbor’s AP and my phone’s hotspot, but both sucked hard. We’re talking 200ms RTT and 15% packet loss. I was apologizing profusely while my video feed turned into a 1998 slideshow; no one could parse a word I was saying. I ended up cutting the video and staying silent. Missed opportunity. Never. Again.
So I went full paranoid and built a proper 5G backup setup.
Poynting XPOL-24 directional antenna mounted on the wall outside my home office
5G signal here is non-existent, so I had to use heavy artillery. The Poynting is a beast. 11 dBi gain, real 4x4 MIMO, cross-polarized, weather-sealed. Point it at the nearest tower and suddenly your SINR jumps from “meh” to “holy shit.”
But pointing a directional antenna without visual feedback is painful. You’re basically spinning in circles, refreshing a web UI, cursing at the sky.
It is 2026, and we are still fighting with Docker’s absolute arrogance regarding Linux networking.
Here is the scenario: I run a hybrid host. On one side, I have a KVM virtual machine running Home Assistant (because I need full OS control and full-disk encryption).
On the other, I have the usual suspect list of Docker containers — NUT for monitoring my shitty Lakeview (Vultech) UPS, and Technitium for DNS and DHCP — running on the bare metal host.
It sounds simple. It should be simple.
But the moment I installed Docker, communication with my Home Assistant VM died. Just ceased to exist.
Docker, by default, treats your iptables rules like they are merely suggestions. When the daemon starts, it essentially clobbers the FORWARD chain, inserts its own logic, and sets policies that effectively isolate anything that isn’t a container managed by itself.
If you have a bridge interface for a VM (like br0 or virbr0), Docker’s rules often end up dropping packets destined for that VM because they don’t match its internal logic for container traffic.
Remote LUKS? Pfft. Here is how to SSH-Unlock a ZFS-Encrypted FreeBSD Root (The Hard Way)
If you run FreeBSD like I do, on a remote server with full disk encryption (ZFS on GELI), you know the panic of rebooting. You are always at the mercy of a KVM-over-IP or a VNC connection from the browser, to insert the root filesystem password at the kernel prompt.
Nevertheless, if you (like me) run a system with kern.securelevel > 0, then installing a new libc means rebooting single user and installing the updates over said KVM or VNC connection, that is not ergonomic to say the least.
The standard solution is usually a pre-boot SSH environment. On Linux, dropbear-initramfs makes this trivial. On FreeBSD? You are building a custom mfsroot (memory file system) from scratch.
Most guides out there suggest using a static shell script as init. This works, but it’s miserable. You lose job control (no Ctrl+C), you have no proper TTY, and good luck if you need to debug network issues interactively.
I didn’t want a hacky script. I wanted a real environment. I wanted init, getty, login, PAM authentication, and a ZFS chroot for maintenance - to install updates.
So I started running home assistant at home
on a raspberry PI 5 machine and I just installed HAOS on an SD. I then started
growing deeply uncomfortable about storing credentials in the HA filesystem in
clear text (any obfuscation is not enough).
Considering configuring an encrypted root with HAOS is simply not possible
without forking it, and also considering that dedicating a RPI5 entirely to HAOS
is a waste of resources, I decided to add an SSD to the Pi, boot it with
raspbian and then run HAOS inside a VM.
This way, I can have an encrypted root on the main host, thus encrypting the
entire HAOS VM.
Furthermore I can now snapshot the entire HAOS VM and I have much more
flexibility in managing it. Last but not least, I can also use the remaining RPI
CPU and RAM for something else.
First, a big thank you to this
post that gave me the
initial pointers on how to set this up. But that 2021 post is now slightly
outdated, and many steps are no longer necessary.